Don’t you just hate it, having to lose someone’s contact number after making a call? Maybe the call was from your old buddy or an important client, but you forgot to save the number to your address book or deleted by mistake.
If you find yourself in this unfortunate situation, you will probably want to recover the deleted call log in your Samsung Galaxy desperately.
Luckily, this guide contains all the things you are required to know about retrieving you call history on your Samsung Galaxy Note 10/Note 9/Note 8/S10/S9/S8.
1. How to recover deleted call log from Samsung Galaxy (using software)
2. How to sync your call history on Samsung Galaxy
2.1. Using Samsung Cloud
2.2. Al methods to sync call history (SMS Backup+)
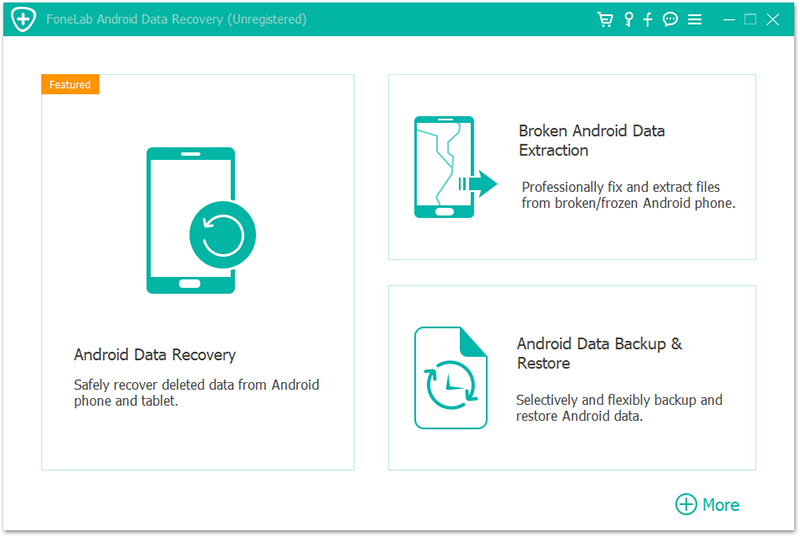
The Android Data Recovery toolkit is not only reliable and efficient but also the best in the business. The toolkit is deliberated to help users recover vital data from their devices regardless of how lost the data is.
Most probably, this is not the first time you have heard about this toolkit. It has been around for some time now. Android Data Recovery Software understands all the aspects of an Android device and it is always ready to ensure that all the demands of the users are met in a timely and reliable manner.
Additionally, it is completely safe and it will not mess up with your data in any way.
Advantages of Android Data Recovery tool
· Allows preview and selectivity of the data you want to recover from your Samsung Galaxy Note 10/Note 9/Note 8/S10/S9/S8.
· Scaffolds a wide range of various file types, such as Messages, contacts, videos, audio, and even WhatsApp messages.
· Recovers Android Data by scanning your Android device or tablets directly.
· Offers support to over 6000+ Android devices and various modes of OS, such as Samsung Galaxy Note 10/Note 9/Note 8/S10/S9/S8, Huawei and many others.
How to use Android Data Recovery Software to recover your deleted call logs
Step 1: Download and Install the software on your computer.
Step 2: Launch the software on to your computer and select the Recovery function. Connect your Samsung Galaxy device using a USB cable.
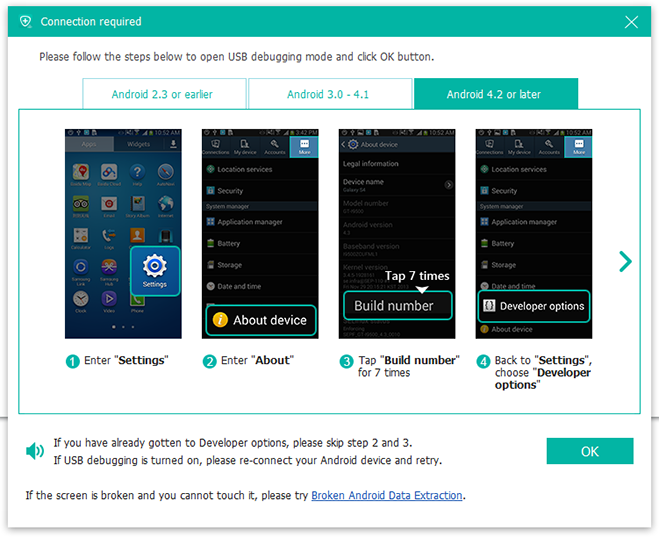
Step 3: Enable USB debugging.
If you haven’t enabled USB debugging, a pop-up message will appear on your Samsung Galaxy device asking you to enable it. But if you have already enabled USB debugging, then skip to the next step.
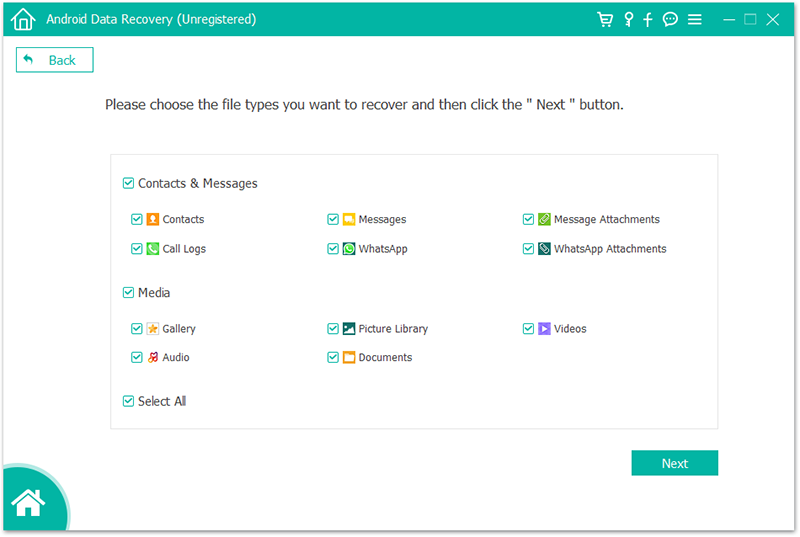
Step 4: Select Data Type
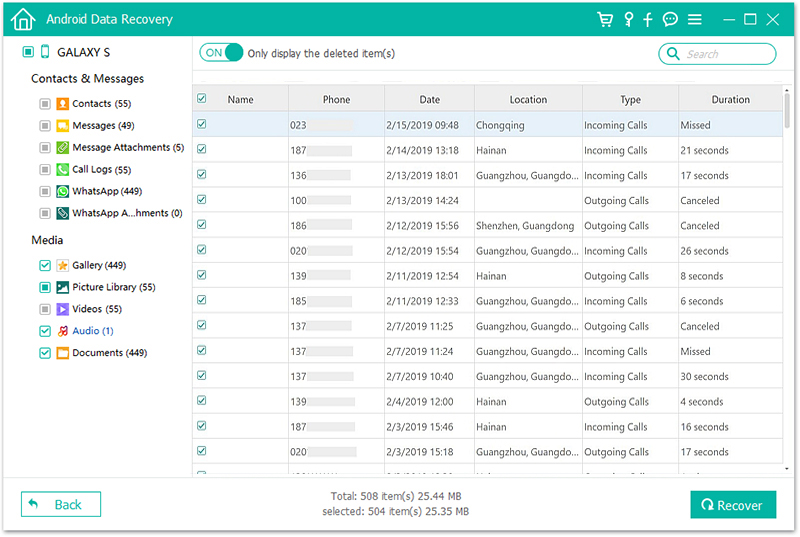
You need to make a selection on the type of data you are planning to recover. In our case, we need to select the Call history. Click Next to permit the program to begin scanning your Samsung Galaxy S10/S9/S8 device.
Step 5: Analysis and Scanning
This process might be time-consuming depending on how much amount of data your device has. Also, you might receive a Super-user Authorization request on your Samsung Galaxy device, click Allow to continue.
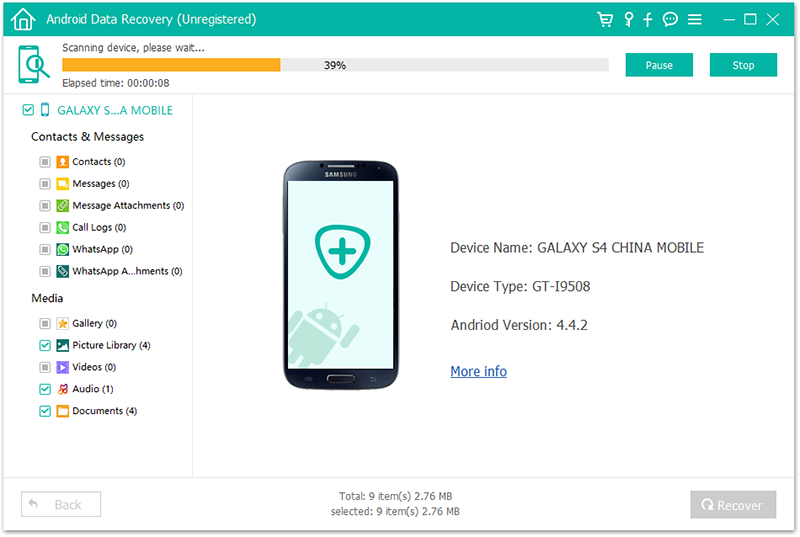
Step 6: Data Recovery
On completion of the scanning process, you should see all your call history displayed on the next window. Choose the calls you would like to recover and then tap Recover.
Samsung Cloud is a free backup and restores service available for most Samsung Galaxy devices ranging from Samsung Galaxy Note 10, Note 9, Note 8, S10, to S9. Samsung Galaxy makes it possible to quickly retrieve device data and settings in the event you lose your device or your factory reset it.
You can only access your Samsung Cloud Storage from a supported Samsung Galaxy device. Whether a wireless carrier or Android, version, the exact feature s if Samsung Cloud varies.
So, if you want to sync your call history on your Samsung Galaxy device, follow the process below.
Step 1: On the home screen, click settings> Cloud and accounts > Samsung Cloud> Start.
Step 2: Sign in to Samsung Cloud by using your Samsung account. If you don’t have an account, you can sign up for a new account.
Step 3: Select Manage Cloud Storage> Backup settings. For auto backup of your data, slide the Auto Backup switch to ON
Step 4: Scroll down and then slide the switch to ON for each data type you want back-ups such as call history, contacts, videos, calendar or gallery.
Step 5: Successful backup of your data will only occur, immediately you tap Back Up Now.
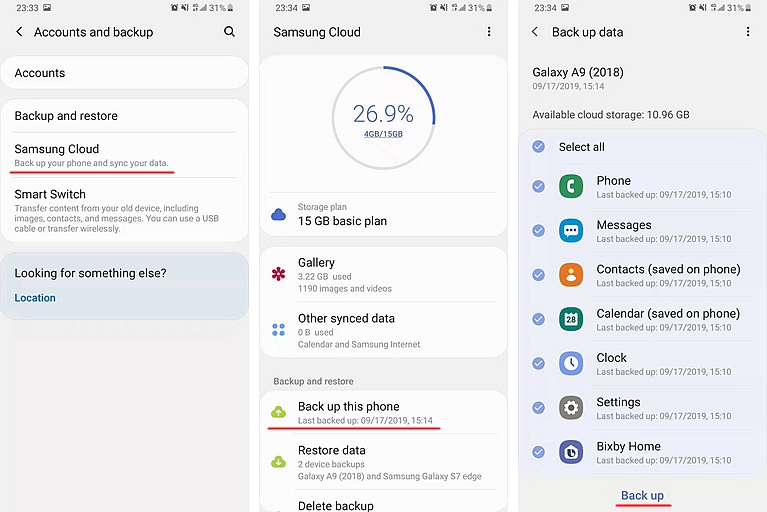
Step 6: Go back to the previous screen on your Samsung Galaxy device. Scroll down to Data to Sync and slide the toggle switch to ON for each data you want (call logs) to stay synchronized.
Step 7: Head back to Manage Cloud Storage. Click the icon details for more information on how much storage is available and how much you’re consuming.
SMS Backup+ is a super easy to use toolkit that not only backups your SMS messages but also your MMS ones, as well as the call log. The idea behind it is to dump all these items into your Gmail account with a custom Gmail Label to maintain them around forever.
To use SMS backup to keep your messages rolling to Gmail, you have to install the app and fire it up. Now, let’s have a walk through it from there.
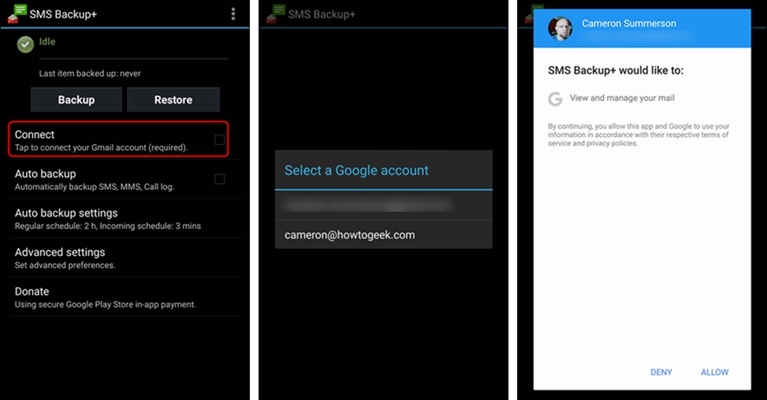
Step 1: Make a connection to your preferred Gmail account. Don’t be worried about security issues because this app uses O Auth, just like all good apps should. So, you can block access at any time from within your Google account settings.
Step 2: Click the Connect checkbox.
Step 3: Select your Google account.
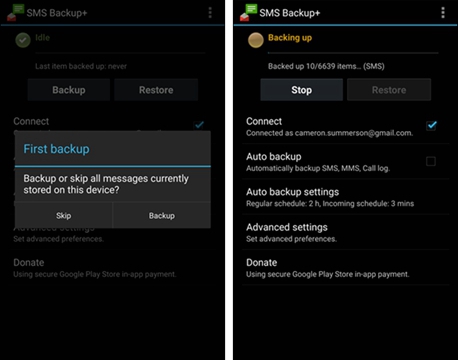
Step 4: Decide whether or not to begin a full backup of all the call history on your device, or skip to only backed up call history present at that time.
Step 5: Head to Advanced Settings
Choose Backup Settings
Select the data type you would like to back up. In our case choose Backup Call log.
Step 6: From there you can click the back button to save and head out.