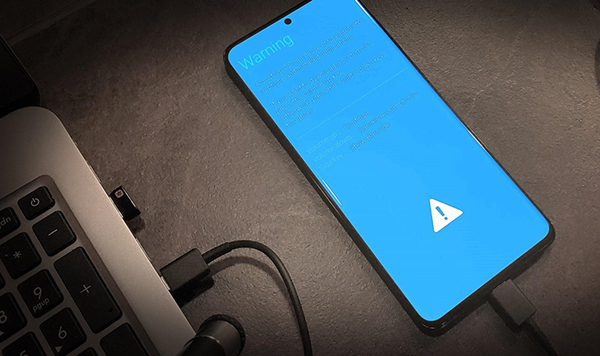
Android devices allow users to toil around with its ROMs, flash new firmware and recovery mode, root. However, sometimes things can go wrong, resulting in a bricked Android device. The word “brick” in our concept, is used to describe an Android device that has turned into a useless piece of plastic and metal scrap. A bricked Android device may turn on but fail to boot up completely or stuck on Samsung logo. Sometimes the damage can be so critical and the device may not power on at all or show no sign of life, black screen of death.
So, if your Android device is bricked, there is no need to worry. There are a lot of ways to fix it in no time.
This guide contains some easy way of retrieving back your vital data, before showing you the process of unbricking your bricked device.
Let’s get on with it!
What is soft bricked and hard bricked on Android
How to recover data from bricked Android device
How to revive your Android device using Recovery Mode
Soft bricked is a condition of Android Devices caused by software problems such as device freeze during booting or boot-loops. This may be as of a result of failure during OS upgrade or flashing of a custom ROM and custom Recovery Mode. Most of the time a soft-bricked device is usually half-dead. Meaning this device is not undergoing the booting process or is crushing all the time, but it can be recognized by a computer.
A soft-bricked device can be easily fixed. The best solution for this problem is flashing a stock Android firmware or a clean and working version of Android firmware to your device. It is advisable to restore a backup or flash stock ROM during this process.
We can say an Android device is hard bricked when your device undergoes an unbootable process without a boot-loop. Signs of a hard-bricked device are luck of signs of life or sometimes it may show a grey screen.
Hard brick on Android devices is a result of the installation of the wrong ROM, or utilization of the ROM manager incorrectly. Hard brick is a little tricky to resolve and it might require the involvement of an expert for professional advice.
If you found yourself in this situation, you should buy another device or try recovering the hard brick device with the help of bootloader.
FORecovery – Android Repair toolkit is one of the best Android Unbrick tool for any Android system problems.
Follow these simple steps to unbricked your Android.
Step 1: Download and Launch the software
Step 2: Select your device name and model of the device for your Android phone or tablet. Once you have done that, click” Next”.
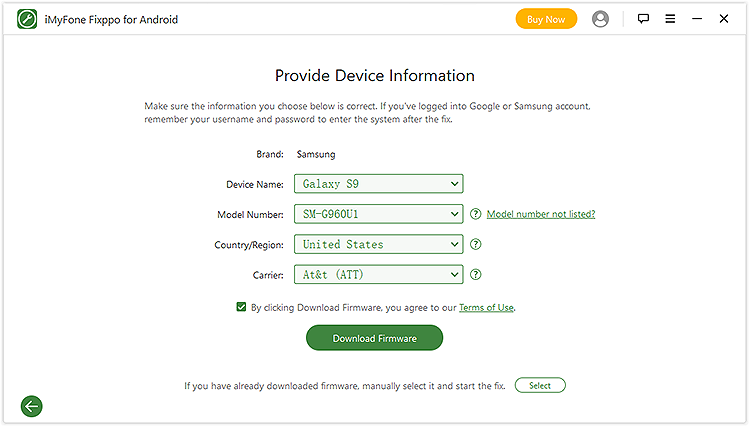
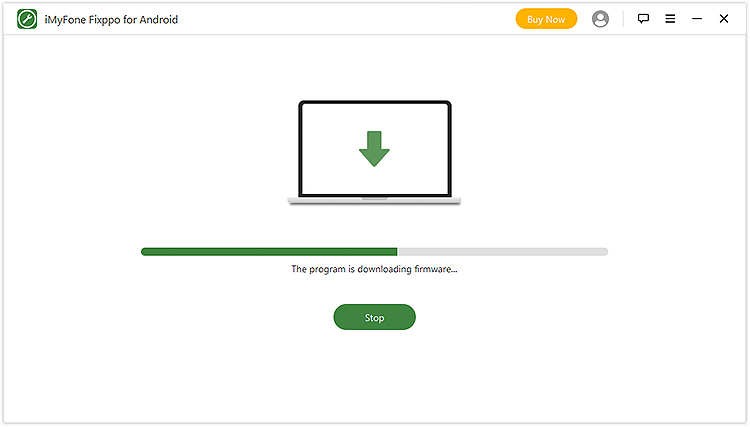
Step 3: Now the software starts to download firmware for your phone.
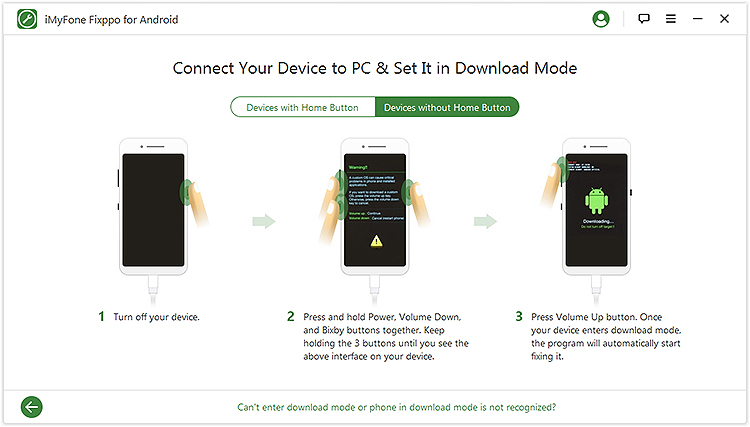
Step 4: Boot your Android into download Mode to fix Android system.
To put your device into download mode, follow the steps below.
Step 5: The software will automatically flash the firmware on your device to fix the Android system.

When installing a new ROM, wait for at least 10 minutes because it will take some time for it to adjust and adapt to its new ROM. If it fails to boot or respond, reset the phone by holding down the “Power” button for 10 seconds and wait for the phone reboot.
If you have installed a new ROM and your device keeps on rebooting, then put your device in “Recovery mode”. This can also be achieved by pressing the “volume up”, “Home” and “Power” buttons simultaneously.
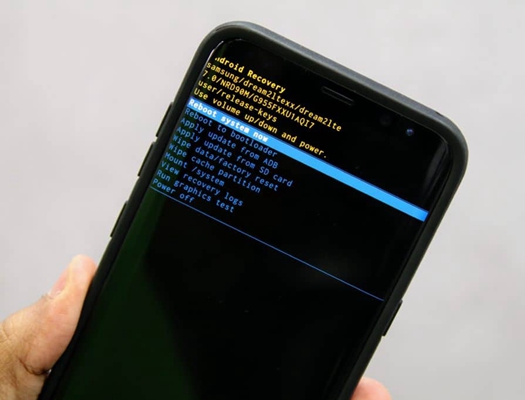
You will see a menu list – use the “Volume” button to navigate up and down the menu. Look for “Advanced” and select “Wipe Dalvik Cache”. Go back to the main screen and choose “Wipe Data/Factory reset”.
All your settings and apps will be deleted. The Android device then will use the right ROM. Reboot execution file to repair your device.
If all the above solutions fail, contact your Android device manufacturer for the nearest service station to fix your bricked Android device. They will be able to return the device to its original condition.