“USB Debugging” may be familiar with you if you have ever used any phone manager software in computer for data backup or try to root your phone, but few of you may still haven’t known a lot about it. However, there’re still some matters needing attention when you use it. Never mind, whether you have used this function or not, this article is a guide for you. After reading, you will definitely have a complete understanding of USB Debugging and how to enable it.
Part 1: What is USB Debugging?
Part 2: Is USB Debugging Safe?
Part 3: How to Enable USB Debugging?
USB debugging was first designed for developers to test or debug their applications by connecting Android device to Android SDK (Software Developer Kit) via USB.
However, it’s also widely used by users now in different situations such as rooting a device and installing a new ROM etc. USB debugging mode is turned off by default, so you need to turn it on manually for use.
As we already had a basic understanding of USB Debugging and its function, you may wonder whether it is safe and what the potential risks might be for you to enable it.
Actually, when USB Debugging provides us with a lot of conveniences, it also brings us a great risk for phone security. With USB Debugging enabled, it’s like you have lost the highest control as long as you plug your Android device to computer. Under such circumstance, it’s much easy and convenient to get your personal contacts, text and files from your phone and even install malware onto your phone. In the meantime, any lock screen under USB Debugging mode is vulnerable just with an unlock software or with source files deleted after rooting.
Therefore, it’s strongly recommended to connect your phone to your personal computer, or at least ensure the security if you do need to plug your phone into other computers. Meanwhile, don’t forget to turn off the USB debugging in time after use to make sure the information security.
The steps for enabling USB Debugging are a little different in various Android devices and Android versions from Samsung, LG, Huawei, Moto, VIVO, OPPO, OnePlus, etc with the newest Android 9 and Android 10. Follow the corresponding steps according to the Android version of your Android device.
1. Enter the system settings menu, then scroll down to “About Phone”
2. Tap “Build number” 7 times in rapid succession, then you will be notified “Now you are in developer mode”.
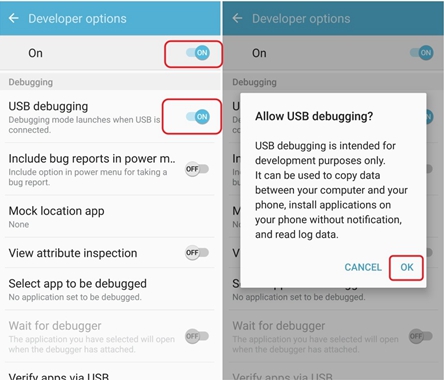
Note: For Android 6.0 or newer, find “Build number” in “About Phone > Software info”.

3. Go back to the settings page and enter the “developer options”, turn on the “USB debugging”, then tap “OK” in the pop-up window of “Allow USB debugging”.
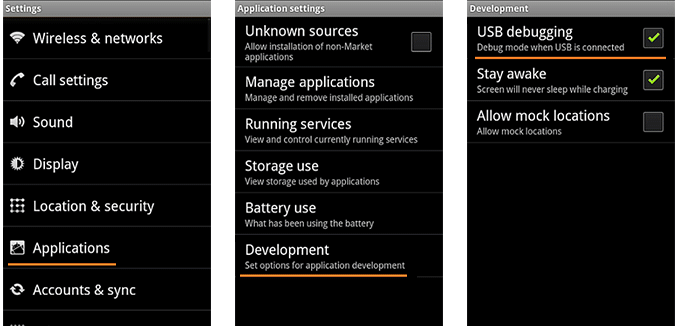
1. Tap “Settings” icon to enter the system settings menu
2. Scroll down to “Application”
3. Tap “development” option
4. Enable the “USB debugging” option
To sum up, “USB debugging” is one of Android’s mobile security risks but it also provides great convenience for both developers and users at the same time. It’s advisable to enable the USB debugging by plugging the device into your own PC, and not to have your USB debugging enabled all the time. Just enable it when needed and turn off it otherwise.