Is your Android phone having Wi-Fi connection issues? Do you see an exclamation mark on the Wi-Fi icon? Or maybe your Wi-Fi authentication has failed and you just can’t get connected. It’s quite embarrassing, isn’t it? But there should be no cause of alarm. By the time you are through with this article you will be sorted. You will know how to reset Wi-Fi connection on your phone. This procedure works for all Android phone, Samsung Galaxy, Moto LG and Google Pixel Nexus.
Step 1: Check the Network Settings
Step 2: Check WI-Fi Password and Re-add Wi-Fi Network
Step 3: Restart the Router
Step 4: Restart your Android Phone
Step 5: Sign in to a Public Wi-Fi Network
Network setting here has been used to mean the Wi-Fi connection and the Airplane Mode. These are the number one factors that can hinder internet connectivity when you are using a Wi-Fi device. So sorting this will help fix the problem of Wi-Fi connectivity.
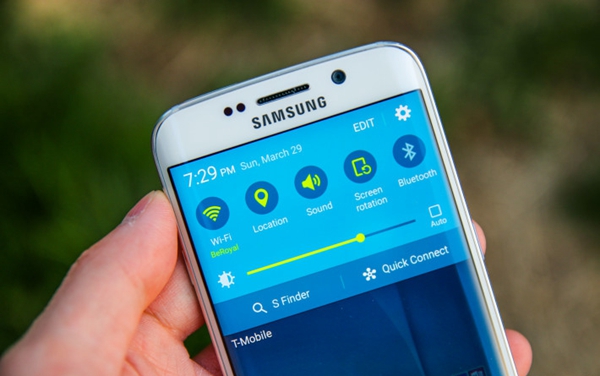
Ensure that your Wi-Fi is ON.
You can do so by following the following procedure
1. Go to the Phone Setting’s App.
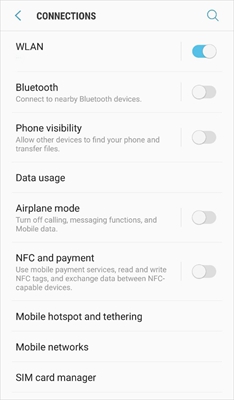
2. Select Connections then tap on Wi-Fi/WLAN to turn the Wi-Fi ON
Ensure the Phone Airplane/Flight Mode is OFF.
Follow this procedure
1. Go to the phone Settings App
2. Then Select Connections, you will see Airplane/Flight mode. Switch it OFF
This procedure involves troubleshooting in order to solve the device issue. Afterwards, you can then delete and re-add your Wi-Fi Network.
Trouble-shoot the phone to find out the exact problem.
Troubleshooting will assist you to know if it is your Device Wi-Fi that has a problem. Or if it is the other devices you are trying to connect to that has problems.
You can follow the following procedure during troubleshooting.
1. Phone Device Troubleshoot: Try connecting to another Wi-Fi device. You can use a friend’s phone Wi-Fi. If you cannot get connected then your phone has a problem.
2. Network Trouble-shoot: Allow your phone to try connecting to the friend’s Wi-Fi or any other Wi-Fi. If the connection is validated, then the Wi-Fi you might have been using had network issues.
3. Internet Trouble Shoot: In the event, you are connected to a Wi-Fi device but you are not able to access the internet then there definitely is an Internet Connection problem.
Solving your Device Issues
There are only three possible issues with your Android Phone. One, you need to add the network password, Delete or re-add a network and if it does not work out, then chances are the problem is with the Wi-Fi APP.
To check the Network Password, follow the following procedure.
1. Open the Settings App on your phone.
2. Then select Wireless & Internet from the drop-down menu. Other phones like Google Pixel Nexus has Network & Internet.
3. Then select Wi-Fi and choose the Network you want to connect to.
4. Then choose show Password.
If your password is incorrect you can insert the correct password and try reconnecting again.
Re-adding a Network to solve Network issues
To re-add a network, you are first required to delete it and then Re-Add. The procedures for each step are provided below
1. Open the phone Setting’s App, then select the Wireless & Internet tab.
2. Check to ensure the Wi-Fi is on and if not turn it on before proceeding.
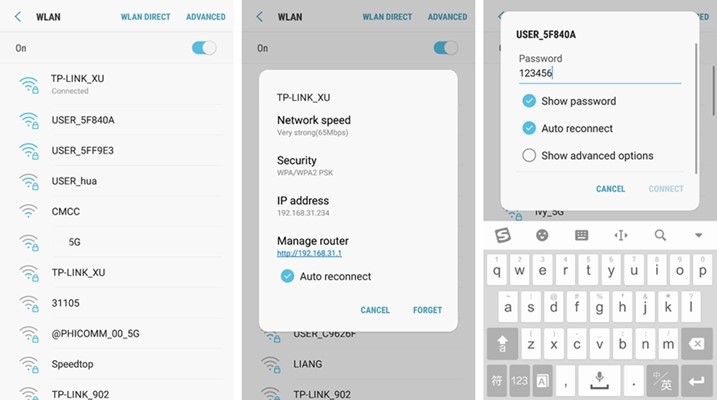
3. Then select Wi-Fi and a list of saved Wi-Fi networks will be displayed.
4. Long tap on a particular Wi-Fi until a “Forget Network” tab is displayed.
5. Then touch on “Forget Network” to delete the Wi-Fi Network.
To Re-add the Deleted Wi-Fi Network
1. Open your phone’s Setting.
2. Select Wireless & Internet.
3. In the pop-down list go further down and choose Add Network.
4. Then enter the password (SSID) and security details.
If after trouble-shooting you realize that it is the router which has a problem, then you need to restart it. You can do so by following the following procedure.
1. Turn off the router and unplug it from the main power source.
2. Allow a stand time of about 20-30 seconds and then plug the router into power supply.
3. Then turn the router on and give it about a minute to try reconnection again.
N/B Ensure that you do not just turn off the router. You must unplug it from power source.
Restarting is a standard procedure that works with a number of devices. For Mobile phones the procedure is standard and it is as described below.
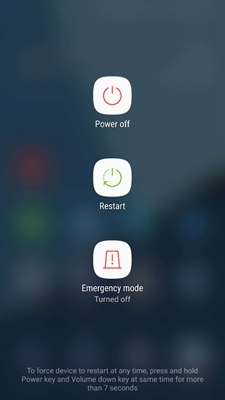
1. Long press the power button.
2. On the menu displayed select Restart.
You can then give your phone time to reboot. It can take you a few seconds.
Public Networks usually have independent DNS-servers that instruct your phone on which login page to open. So if you have alternate DNS servers such as Google DNS or Open DNS then they are not going to open public Wi-Fi. So you will need to disable this alternate DNS by deleting them.
How to disable the Alternate DNS server in order to access Public Wi-Fi.
1. Open Settings on your phone.
2. Open the list of Networks under Connections.
3. Long press the Network of interest and tap on Modify Network.
4. You can then delete any text in the DNS Field and you will e good to connect to Public Wi-Fi.
5. To Connect to Public Wi-Fi, Just use the normal Wi-Fi Connection Procedure.
The procedure discussed above is expected to work well with all Android phones. It is compatible with Samsung Galaxy phones, Google Pixel/Nexus and Moto LG. If you follow the procedures well then you will not have any problems with your phone Wi-Fi Connections.
However, if you follow the procedure and still you fail to fix the problem of Wi-Fi connection, then you need to take your phone to a technician. You can check around your region and ensure it gets only to the best hands.