As the use of smart phones keeps increasing, so does the need for storage capacities. This need is enhanced when it comes to pictures because people have adapted to using their phones to take pictures that hold memories and s such, these pictures become very valuable. Cloud storage such as Google Photos and Dropbox offers one solution that’s also considered most convenient to many people. Knowing the right procedures to follow when using cloud storage is very important since the alternative can lead to file loss.
See Also:
Backup and Sync Samsung Galaxy Photos With Google Account
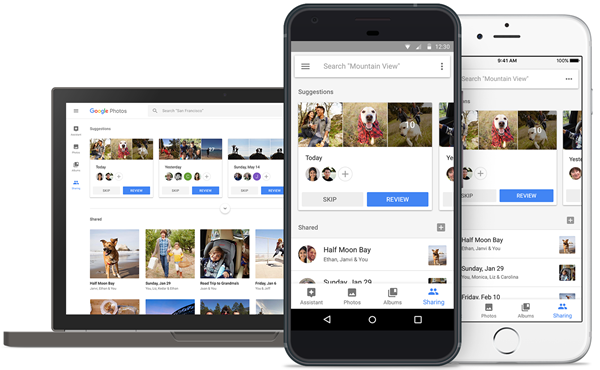
Part 1: How to Back up Photos Using Google Photos
Part 2: Restore Deleted Photos from Google Photos
Part 3: How to Back up Photos Using Dropbox
Since one of the most effective ways to ensure safety of your pictures is to back them up, Google photos can be a great avenue for doing that.
Step 1. Android devices usually have the ability to classify different photos into different folders. This makes it easier for you to carry out the first step, which is to open the Google photos app. It comes with Android phones so installation shouldn’t be a problem.
Step 2. Google photos will associate with the same Gmail or Google account you log in on your Android device, or the application will prompt you to log into your Google account if you signed out.
Then go the settings menu to turn on the synchronization feature. tap on “backup and sync” to turn it on. If it was already on don’t turn it off.
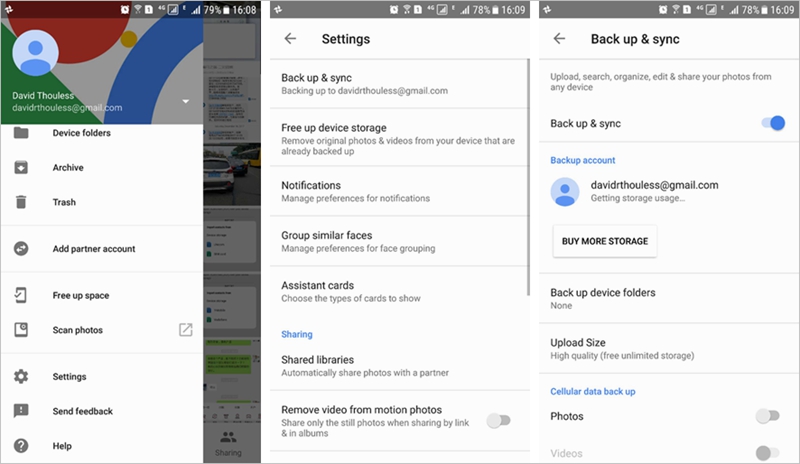
Step 3. Select “back up & sync > Upload size” and choose the photo upload sizes. On Google Photos you have 15 GB of free storage for photos and videos if you upload original photos and videos, or unlimited storage if you choose to upload high quality (compressed) photos.
Step 4. Google Photos will back up your camera roll by default. To backup app photos or other photo folders, click on “device folders” then go to the next step which involves choosing the specific folders you need.
The backup process will begin automatically with Wi-Fi on.
Step 5. As the final step, go to Google photos app and tap photos. At the top, check whether you’ve backed up all the photos successfully or some of the photos are still waiting to back up.
It’s important to remember that making synchronization changes on your phone will affect other apps as well. After this initial backup, Google photos will automatically backup any new pictures you take so you don’t have to repeat the process.
One of the situations people face is losing their treasured pictures on their phones and not knowing how to retrieve them. Google photos also help with this situation in simple steps.
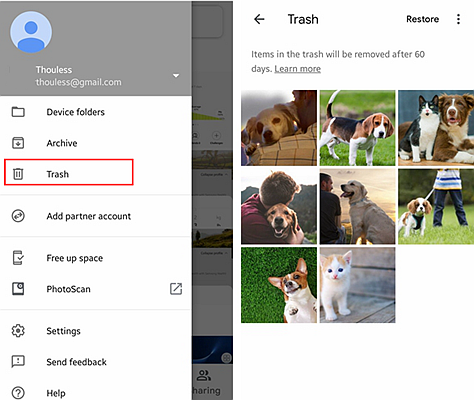
Step 1. Open Google Photos, go to menu and tap on “trash”, then go through to find the photos you need. The Trash will retain your deleted photos for 60 days.
Step 2. Tap on the photos and hold them longer to select them. After picking all the items you need click on “restore” at the bottom of the app. The pictures will be restored automatically.
Step 3. Go back to the original location of the photo before it was deleted and confirm its presence.
Other than Google photos, Dropbox also gives users the freedom of backing up their files including photos for free. The availability of Dropbox app for mobile phones has simplified this process by giving users a more forward way of dealing with their files. The following steps should be followed when backing photos:
Step 1. Unlike Google photos, Dropbox has to be downloaded and installed before use. Open the play store and search for the Dropbox app before clicking download. You’ll be required to authorize access to some of the items on your phone. Accept this then wait for the download to complete. Make sure you have a good Internet connection to allow smooth installation.
Step 2. Open Dropbox then sign in by entering your username and password. If you don’t have an account you’ll have to open one by tapping on “sign up” then following the provided steps filling the required fields appropriately.
Step 3. After successfully logging into your account, tap the plus sign to allow you to add the photos you need. This will you other options like uploading.
Step 4. Select “upload photos or videos” then navigate to the location of the pictures you need. Select the folders containing the photos by tapping on them. The upload sign is usually located on the right side of the screen at the bottom. After selection the upload will happen automatically.
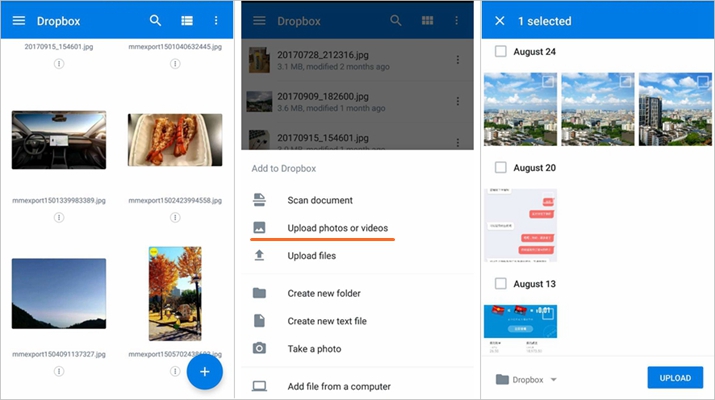
Step 5. Check the progress and once complete, confirm that you have successfully backed up the files. Log into your Dropbox account once more and check the backup folder to confirm the presence of your pictures.
In addition to Android devices, file sharing, transfer and backup can easily happen with devices running on other operating systems as well. The Google Photos and Dropbox app can be used to facilitate file backup between iOS devices, Android device and computer.
Though Google photos app offers a maximum 15GB, this is usually enough space to store many pictures without distorting their quality. Dropbox on the other hand offers only 2GB free memory space making it a better solution for other types of files such as documents rather than photos. In addition to these cloud storage applications, you can use Google drive for the same purpose getting the same results. Whichever you choose, make sure you read the terms and conditions of service to avoid getting any surprises such as the storage space or payment requirements. In some cases you may be required to make a certain amount of payment for a specific duration after the free space runs out.