What would make you want to have an offline copy of your Facebook data? Imagine of this scenario: You have lost your Facebook password and you do not seem to really remember it. You try all the account recovery options provided but still you are not able to access your account. What will you do? Will all your photos, videos, interesting updates which you have shared with your friends all be lost? Suppose you knew how to download a copy of your Facebook data and you actually did this before losing your password?
Perhaps you may think that this first scenario is not possible. But, remember, sometimes things go south.
Facebook also has a right to shut down your account if they find that you have violated one of their terms and agreement. Suppose you wake up one day, excited, and planning to share some of the exciting sneaks which you had over the weekend only to find that your account has been flagged down. From experience, it is difficult to recover your account once it has been flagged down by Facebook. They will just prompt you to upload a ‘clear passport photo’ and you will likely not get any further communication from them.
So to avoid all these possible setbacks, it is advisable that you always have a copy of your data as you may need it.
This article will guide you on how to download a copy of your Facebook data and also how you can easily access it offline once you download it.

How to Download a Copy of Your Facebook Data
What’s in your Facebook Data?
1. Log in to Facebook using the Facebook web option. Do not use the Smartphone applications such as Facebook Lite.
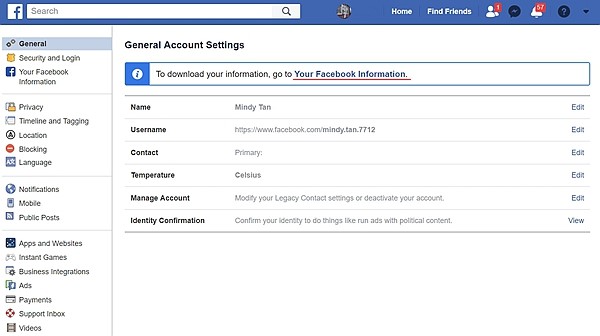
2. At the top right menu click on the down-pointed arrow after the help icon. A drop-down menu should appear. Select settings from this drop-down menu.
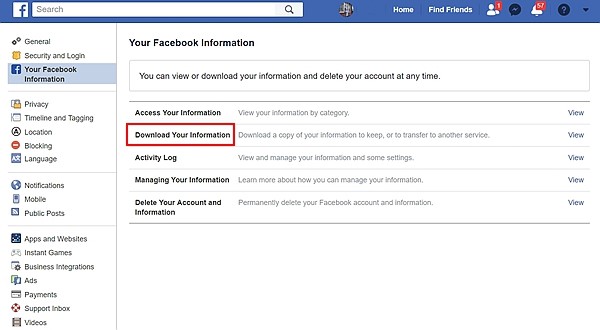
3. Scan the menu on the left bar of the resulting menu. You should find an option named, ‘Your Facebook Information’. On clicking this link, a new interface will appear with several prompts. There will be the option of accessing your information online, downloading the information or the option of just checking the activity log for the past days. For those who would like to permanently delete their Facebook account, there is also an option to do so.
Since your main concern is to know how to download a copy of your Facebook data, I will ignore the rest of the menu options and focus on how you can get an offline copy of your Facebook data.
4. Once you select the option of downloading a copy of your Facebook data, Facebook will give you an option of either downloading all the data or just selected bits of it. For the basis of having all the information in your download folder, it is advisable that you select the option of downloading all of your data.
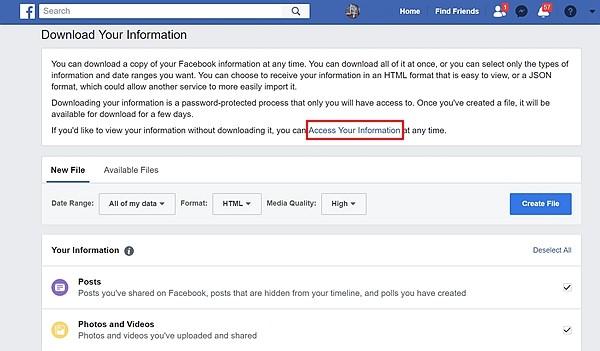
5. After selecting the ‘Create File’ option Facebook will initiate the process of getting all your Facebook data in one place. The length of this process will depend on the size of your Facebook data.
6. You will receive an email notification once the zip file is ready for downloading. Clicking on the link on this email will take you back to Facebook where, for purposes of security, you will be prompted to enter your Facebook login credentials. For security reasons the zipped folder which contains your Facebook data is only available for a few days after which Facebook erases it. Thus it is advisable to download the zipped file as soon as you get the Facebook email notification.
7. Once you download a copy of your zipped folder see to it that you preserve it on a safe folder since it contains all your information which you ever entered on Facebook. You can, as well, consider encrypting this folder to avoid malicious and unauthorized persons from accessing your folder.
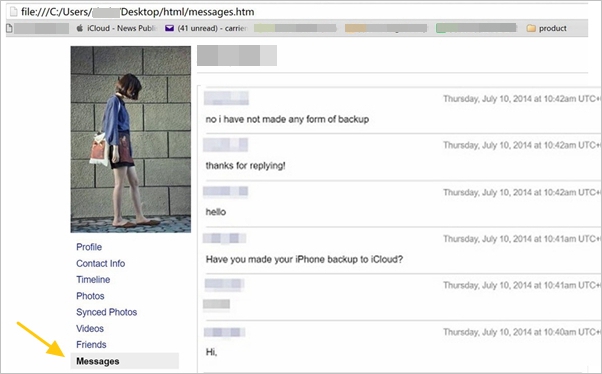
After you have downloaded your zipped folder and unzipped it, you will find several subfolders within the main folder. Such subfolders will include HTML, photos, and other extra folders such as the messages folder. The index.htm file within the main folder has links to the rest of the subfolders. Thus double-click it to open it.
Once the index.htm file opens in your default browser you will have an option for viewing the contents of different HTML pages linked to the main index.htm file.
1. The Profile Page – If you click on the profile link, you will be taken to a profile page which has all the personal information which you submitted to Facebook. It will have your contacts, those who you identified as family members, and a list of your favorite music and videos. In short, this page has all the information which you entered in your profile section in Facebook.
2. The Friends Page– This HTML page has all the information about your Facebook friends. It will not only contain the list of your current Facebook friends, but also those who sent you friend requests and you declined or ignored them.
3. Timeline Page – This link has all your posts which you submitted on Facebook. The posts are sorted from the latest post to the oldest posts. The only thing you will not like with this page archive is that it will not have the accompanying images. The positive side with this is that this page will capture all your posting history on Facebook.
4. Photos Page – This page is similar to the timeline page. The only difference is that it has the photos but does not display the accompanying captions. However, the comments which were made by your friends or your replies to such comments appear below each image.
5. Videos Page – The video page has a list of all the clips which you uploaded. This includes those video clips which you recorded and you never shared to your timeline. The quality of the downloaded videos is relatively poor. Perhaps this could be in a bid to save on space and effectively compress the downloaded archive folder. But the videos are not entirely blurred. You will be able to view them either on a normal browser or by the use of other video viewing applications installed on your computer.
6. Ads Page – You will get several pieces of information on Ads page. You will find a list of topics which, according to Facebook, interests you. You will also get statistics on the number of times you clicked on certain adverts. The only limitation you will find with this is that Facebook does not display all the ads which you ever clicked but just the recent ones.
7. Messages Page – Facebook also archives all the messages which you exchanged while using the Facebook site or one of its apps. Clicking on the message page will give you a list of friends who you have ever exchanged messages with. It will also give you a list of those people who are not your friends but tried to reach you through the messenger.
8. Events and Pokes Page – Clicking on this link will give you a list of all the Facebook events which you have ever attended. It will also show you a list of those events which you were tagged by your friends. Alongside this, you will also get all the pokes which you either received or poked your friends.
9. Security Page – This page has a list of all your sessions. A session is usually established by a website once the user logs in to uniquely identify such users. Thus this is a list of all sessions which were created from the time the Facebook account was created. This page also identifies the different IP addresses which were used to log in to Facebook and has also another list of all the logins and the logouts which a user has ever made with their account.
Facebook has a very detailed information about each of its users. Since Facebook has options to control your privacy, it is always advisable to limit the amount of information which is in the public domain. By being careful not to over-submit user-traceable information to Facebook, you will be able to reap the benefits of this giant social media while still keeping your privacy reasonably intact.