The screenshot feature provides an excellent way of capturing the snapshot of a screen and preserving it as a static image. There are different scenarios which may raise the need for you to take a screenshot.
One of these is when you need to share specific content on your smartphone screen with your contacts. You could as well share a screenshot when you are giving instructions on how to perform certain actions on the phone and you feel that words alone will not effectively explain the steps to be taken. In such a case, a screenshot simplifies the explanation.
A screenshot could also be an easy way of capturing interesting snippets on Social Media websites and sharing them with your connections. For those who wish to capture instantaneous parts of a video playing on their phone, a screenshot will also come in handy.
With iPhone XS/XS Max/XR one is able to not only capture a screenshot but also manipulate the screenshot by adding text, cropping the image and even scribbling on the image. This post will give you 2 ways to take screenshot on iPhone XS/XS Max/XR and also guide you on how you can mark up the captured screenshot.
1. How to Take Screenshots with Buttons
2. How to Take Screenshots with AssistiveTouch
3. How to Mark Up a Screenshot on your iPhone
Taking screenshots on iPhone XS/XS Max/XR is quite easy but has a little variation from the procedure used in earlier iOS versions.
iPhone XS/XS Max/XR do not have a hardware home button and thus you can’t press the home button simultaneously with the power button to take a screenshot. But there is an easy way of doing it and you will soon get used to this new method.
Follow the steps below to take a screenshot with buttons on your iPhone XS/XS Max/XR:
Step 1: Navigate to the screen you would like to take a screenshot.
Step 2: Press the lock button and the volume up button simultaneously. These two buttons should not be difficult to locate. The power/lock button is located on the right side of your smartphone while the volume up button is on the left side.
If you capture a screenshot successfully, the screen will flash and a shutter sound will be produced. This sound will only be produced if you have enabled sounds on your phone. For the case where you have disabled sounds on your iOS device, you will only see the screen flash.
Step 3: The captured screenshot is displayed on the bottom left side of the screen as a thumbnail. You can tap on it to start editing the screenshot or swipe it to the left to hide it. If you take no action, the screenshot will disappear in a few seconds. Usually, the captured screenshots are stored in the camera roll. In case you need to access the screenshot later, you can always head there.
The second way of taking screenshots on iPhone XS/XS Max/XR is by use of the AssistiveTouch. This accessibility feature is designed to enable people with motor challenges to perform different actions on their iOS devices with minimal finger movements. Taking screenshots with AssistiveTouch is quite easy and you may as well prefer it over the use of hardware buttons.
Here is how to capture screenshots with AssistiveTouch:
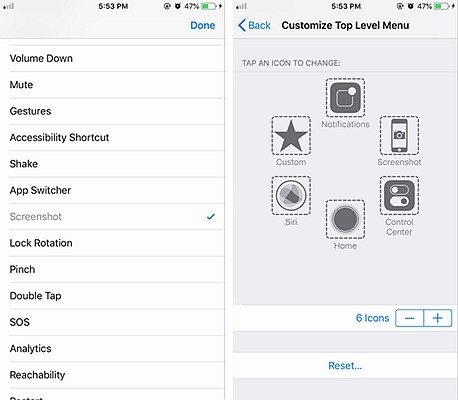
Step 1: Open the Settings App and scroll downwards to the “General > Accessibility” section.

Step 2: Look for the “Assistive Touch” option and toggle the button from OFF to ON.
Step 3: The next stage is to customize the “Top Level Menu”. Tap on this menu to get a list of icons which can be customized. If the screenshot icon is not among the displayed icons, tap the + (Plus) button at the bottom right side to add it.

Step 4: Customize the action which will launch the “Top Level Menu”. The options which can be used include the single tap, long-press, double tap, and 3D touch.
Step 5: Head over to the screen you would like to screenshot, open the Top Level Menu by performing the custom action selected for this menu, then tap on the screenshot icon. The screen will flash for a moment and a shutter sound will also be produced. The captured screenshot will be displayed as a thumbnail on the bottom left side of the screen. Tap on this thumbnail to start editing the screenshot.
iPhone XS/XS Max/XR has rich features to enable you to perform different markup actions on your captured screenshot. You will be able to crop the screenshot, scribble on it, and even add text and signature.
To perform these actions, follow the steps below:
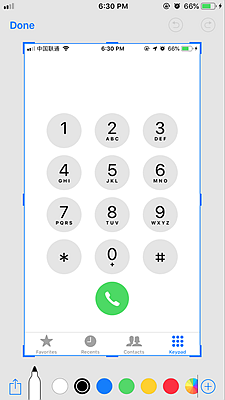
Step 1. After taking your desired screenshot, tap the screenshot thumbnail on the bottom left side of the screen to activate the screenshot editing mode.
Step 2: Crop the screenshot by moving the frames around the image inwards. In case you make a mistake, just tap on the undo button at the top right corner of the screen.
Step 3: Once you crop your image to the right size, tap the “Done” button on the left top corner of the screen and then select the “Save to Photos” option.
Step 1: From the screenshot editing interface, tap on your desired brush at the bottom and select the color of your brush.
Step 2: Scribble whatever mark you need on the screenshot by just moving your finger on the screen.
Step 3: Once done tap on the “Done” button then save the image in the photos folder.
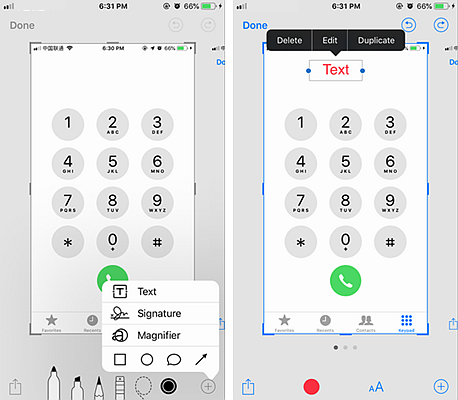
Step 1: From the screenshot editing interface, tap the (+) button at the bottom right corner of the screen to access extra editing options. A popup menu with several options such as Text, Signature, and Magnifier will be displayed.
Step 2: Select the “Text” option. From the text editing menu at the bottom, choose your desired text font and color. Tap on any part of the screen and write your preferred text in the text box displayed.
Step 3: After you finish inserting your desired text, select the “Done” button and then save the edited screenshot by tapping the “Save to photos” option.
Note:
In case you make mistakes, you can always reverse the action by tapping the “Undo” button at the top right corner of the screen.
You have got the 2 ways to take screenshot on iPhone XS/XS Max/XR. In addition to this, you have also got the tricks and tips which you can use to edit the screenshot such as cropping the screenshot, scribbling on it, and also how to add text on the screenshot. Next time you are taking the screenshot, perform some of these editing manipulations to get your desired results.