Imagine a scenario where you are having a serious meeting either at a workplace or even at home and then the phone keeps on ringing. Unless it’s an emergency, such calls are not a welcome at such instances. Another scenario could be when you are sleeping. Every person loves a tranquil, peaceful, and quiet environment to sleep. Any sounds either from outside or from your devices are usually undesired at such times. Although you may not be able to control external sounds such as those made by passing cars, you can fully control the sounds emanating from your iPhone.
There could as well be other instances in your life where you want to completely cut off external communication. It could be a daily meditation routine or it could as well be certain undertaking where you need absolute concentration. In such instances, any sound from your iPhone will be a nuisance to you.
The best way of controlling any sound coming from your phone is through the use of the “Do Not Disturb” settings on your phone. Knowing how to use “Do Not Disturb” mode on your iPhone is, therefore, important.
What’s “Do Not Disturb Mode” and How Does it Work?
How to Enable “Do Not Disturb” Mode from Control Center
How to Schedule ‘Do Not Disturb’ to Turn on Automatically
Once you enable “Do Not Disturb”, the feature will take control of all sound-producing actions and events on your phone. Thus your phone will not be able to play the usual sounds for incoming calls, messages or for any other third-party sound-based notification on your iPhone. However, you will be able to get notifications of the people who tried to access you during the “Do Not Disturb’ period and also get your message notifications displayed on the notification interface.
You should note that any alarm set to ring at a given time will still ring even if the iPhone is in ‘Do Not Disturb’ mode. This is recommendable since you might need an alarm to wake you up, remind you of certain tasks, and even mark an end of a given activity. Thus such an exclusion is vital otherwise you may fail to accomplish certain tasks at the right time or even wake up late just because you forgot to disable the “Do Not Disturb” mode on your iPhone.
There are those occasions and times during the day or night that you just want your phone to stay quiet. Switching it off is not a good option since you will need the iPhone to check the time and perhaps perform a few other tasks using the phone such as browsing or reading your favorite e-book.
To quickly enable the “Do Not Disturb” Mode from Control Center, follow the steps below:
1. To access the control center, for iPhone X/XS/XS Max/XR, swipe the screen downwards from the top right side. for iPhone 8 and older model, swipe the screen up from the bottom.
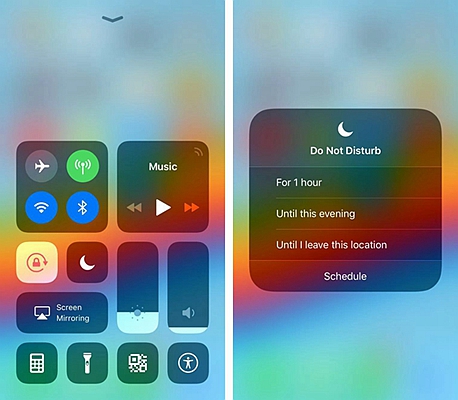
2. From the list of icons displayed, look for an icon which is shaped like a crescent moon. This is the ‘Do Not Disturb’ icon. Tap on this icon to enable the Do Not Disturb mode.
3. If you want to get extra “Do Not Disturb” options, 3D touch the screen (Hold the screen with different levels of pressure). These extra options give you the ability to choose the length of time the “Do Not Disturb” mode will stay on.
To disable the “Do Not Disturb” feature, simply access the control center and tap the Do Not Disturb icon.
If you have certain regular and repetitive events in your daily program which require you to turn on the ‘Do Not Disturb’ mode, then the best way of doing it is by setting the ‘Do Not Disturb’ functionality to go on automatically. This will save you the inconveniences associated with forgetting to turn the ‘Do Not Disturb’ mode on.
Below are the Steps on how to schedule this functionality to turn on automatically:
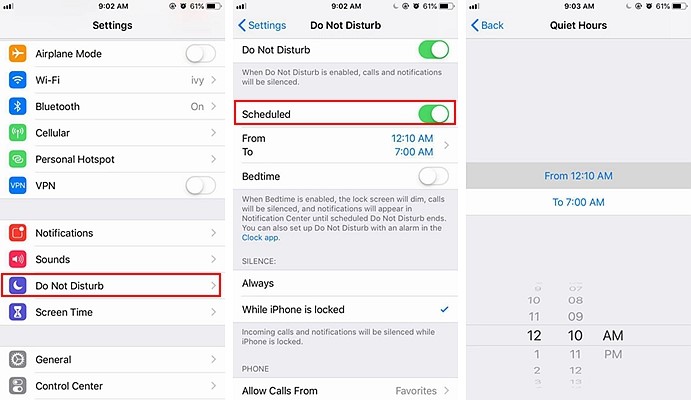
1. Tap on the Settings app to launch it.
Scroll downwards and select the “Do Not Disturb” option.
2. A new interface will be displayed. Look for the “Scheduled” and tap on the button to switch on the “Do Not Disturb” automatic scheduler.
3. Tap the default schedule time displayed below the scheduler to adjust the “From” and “To” timing.
Swipe up and down to adjust the “From” time and “To” time. After setting this, you can as well enable the bedtime feature. This feature is just below the time settings. If you enable the bedtime feature, the phone lock screen will appear dimmer during the set “Do Not Disturb” period, all calls will be set to silent mode, and no notification sound will be played until the scheduled “Do Not Disturb” time ends.
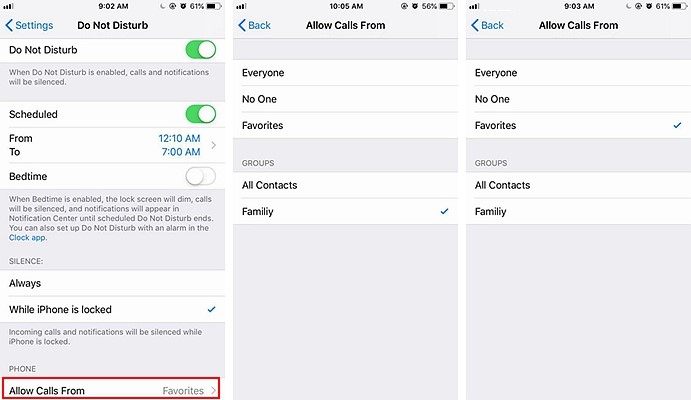
Tips: You can also customize this feature in such a way that your phone will be able to play sounds on specific incoming calls and specific message notifications while barring the rest.
The “Do Not Disturb” mode is important since there are times and occasions when one needs some level of quietness and silence. This functionality is quite beneficial for those who like to create a quite personal improvement time, those who have jobs demanding a high level of concentration, and those who have high-end meetings where phone calls will be treated as a form of non-professionalism.
Besides these categories of people, you may personally need the ‘Do Not Disturb’ time when you want to enjoy some tranquil moments with your family, partner or your friends. Use this feature to gain more control over your iPhone and let this smart device serve your needs and not the other way round.