We all suffer from boredom from time to time, and the same is true while using our Android devices as well. It might be the fact that we do not feel interested in using the same notification sounds again and again. In the subsequent paragraphs, we have provided a comprehensive guide on how to change the notification sound on your Android phone Samsung Moto LG OnePlus easily and successfully.

How To Change default Android notification tone?
How to set a specific ringtone to a contact?
How to Apply a custom notification tone using Ringtone Maker?
How to Apply a custom notification tone using Zedge?
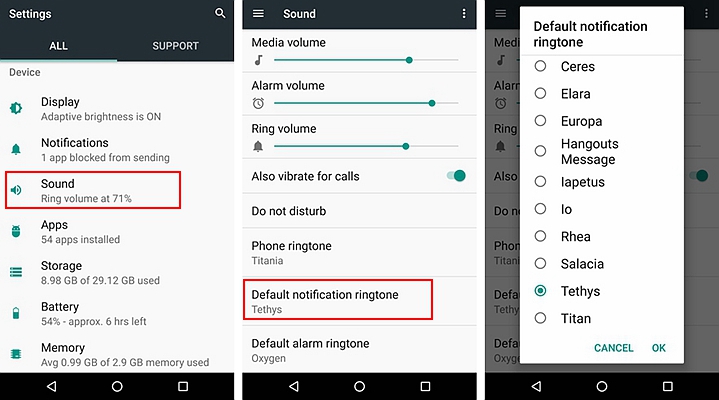
In case you would like to alter the notification sound in your Android gadget, follow the subsequent steps:
Step 1: Go to the home screen and launch the Settings app.
Step 2: Tap on the “Sound” icon.
Step 3: Tap on the original notification sound.
A list of notification sounds will show up, and you need to pick a tone and listen to it. Tap “OK” if you like it. That’s all!
However, the setting name might differ from version to version depending on the Android phone manufacturer. you need to launch the Android settings for the older versions which are making use of Android 6.0 or even lower and then you ought to select Tones and notifications and after that Ringtone.
How can you create your personal notification tones?
Step 1: Your Android smartphone has to be connected to your computer.
Step 2: Go to the internal memory’s main folder.
Step 3: Go to the folder called Notifications. Create one in case it does not exist.
Step 4: The sound files have to be copied into that folder and they will be visible on your smartphone.
It is imperative to select your contact and then your preferred ring tone so as to set ringtones for your contacts. However, this process might vary slightly depending on the manufacturer of the Android device.
Step 1: After going to the Contact application, you need to pick a contact.
Step 2: Click the Menu button and select “Set ringtone”.
Step 3: After tapping it, choose your preferred tone.

Google Hangouts:
Step 1: Select the contact’s name or select an active Hangout.
Step 2: Click “People & Options” after going to the Menu.
Step 3: alter the message as well as video calling tone for that particular individual or group.
You’ll come across different types of free apps out there which will help you to edit the MP3 files and then transform them into ringtones. These apps can be used to create ringtones without any need to use a computer for editing or transferring the file. Only the MP3 file will be needed that will be transformed into your ringtone eventually.
You need to get the MP3 file which will be transformed into a ringtone. You’ll be able to edit an MP3 file with the help of these applications and then set it as your preferred ringtone. However, you need to store the MP3 file on your Android smartphone in order to edit it. It would be possible to get the file to your gadget in a number of ways:
The MP3 file can be downloaded to the storage of your device directly in case you do have a link to it.
In case the file is already on your computer, it will be possible to either connect your Android device to your PC so as to transfer it to the Music folder or you might even use services such as Dropbox for uploading the file from the computer and then download it on your device directly.
In case you have purchased the MP3 file from Amazon or Google play, it would be imperative to download it to your personal computer at first and then it has to be transferred to your Android device.
Step 1: A Ringtone maker application has to be downloaded initially. You will get this Ringtone Maker application for free from Google Play Store.
Step 2: The Ringtone Maker application which was just installed by you needs to be launched now. A list of ringtones will be visible along with audio files in their default folders. If your MP3 happens to be one of the default folders out there, it is going to be listed right here. In case it is stored in any other location, you have to search for it.
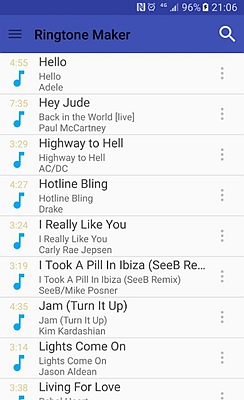
Step 3: Tap on the Menu Button, and then select Browse. In this way, you’ll be able to navigate through the folders so as to come across the MP3 file.
Locate the MP3 file that will be turned into a ringtone. Try to make use of the folders for finding the MP3. Otherwise, you need to look at the Downloads folder in case the MP3 was downloaded online.
Step 4: Tap on the MP3 so as to open it. You will be able to see the song’s waveform along with the editing and playback controls. You can perform your edits right here since it will not affect the original file.
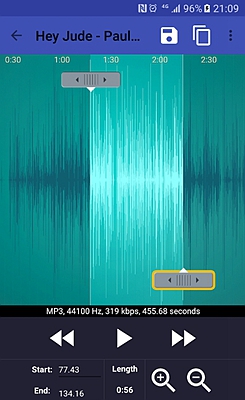
Set the Start as well as End points. A couple of sliders will be visible in the graph while the song is loaded in the editor. You need to drag these sliders for setting them perfectly where you want your ringtone to begin and also where you’d like it to stop. However, the ringtone’s length is going to differ depending on the time for which your gadget rings prior to going to voicemail.
Next, you need to click on the Play button whenever you like to hear the selection. It will also be possible to make some adjustments to the start plus end times by simply tapping on the “+” and “-” buttons.
It would be prudent to make it a bit shorter in case you are making a notification rather than a ringtone.
Step 5: Add a fade in as well as fade out. There is an innovative fade function included along with the application which can be accessed by simply tapping the Menu button. You can set the length of the fade from the drop-down menus.

Step 6: You need to open the Save As menu by tapping on the Save button.
Choose how the ringtone is going to be used. Although Ringtone is going to be selected by default, you will likewise have the options of selecting Alarm, Notification, or even Music. The ringtone can also be given a different name other than the default one.
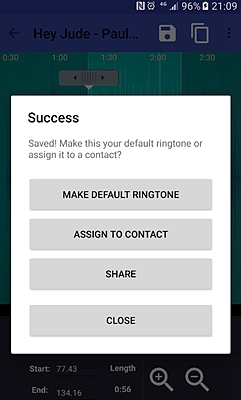
It is important to figure out what you’ll be doing with the new ringtone. In fact, the application will prompt you to choose your action once the ringtone is saved. It would be possible to make it the default ringtone, or you might also share it, assign it to any particular contact, or do nothing at all.
Zedge happens to be an innovative application that will help you to personalize your wallpapers as well as sounds. It will also allow you to download and also set the ringtone from the very same screen.
After finding a ringtone in the application of your choice, perform the following steps for setting it:
Step 1: Tap on the Download button at the center of the screen.
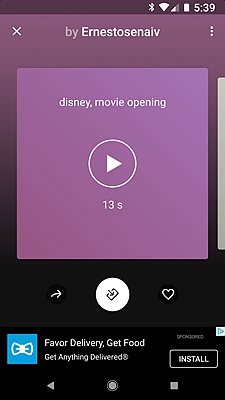
Step 2: Tap on Set Ringtone.
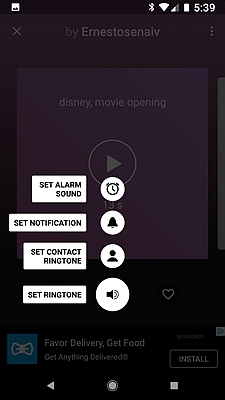
Step 3: Allow the application to download the ringtone by tapping on Allow.
Tap on Settings so as to go to the page where you will enable Zedge to modify the system settings including your ringtone.
Step 4: Tap on Allow modify system settings.

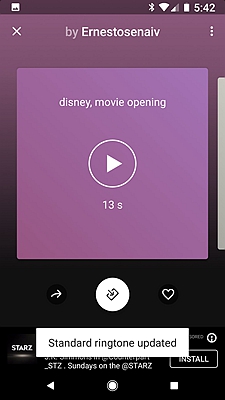
Step 5: Tap on the Back button so as to go back to Zedge. A notification will show up at the bottom of the screen informing you that the ringtone is already applied.
It does not take many steps to alter the notification sounds on your Android smartphone. However, try to have fun and change the sounds from time to time according to your own preference! And the good thing is that it will be possible for you to enjoy the extra features whenever your Android device is updated.